本文介绍了如何借助Vue.js和Laravel 7创建一个简单的视频聊天应用。
如何实现视频聊天
我们会用到一个免费的开源项目WebRTC(Web实时通信),它能为Web浏览器和手机应用程序提供实时通信。
概述
步骤1——安装和设置Laravel
步骤2——安装npm包
步骤3——创建Pusher账户
步骤4——创建页面
步骤5——测试
步骤1 安装Laravel UI和Vue包
安装Laravel
laravel new laravel-video-chat
既然Laravel已经安装完毕了, 接下来我们就来安装Vue.js前端脚手架。安装要运行以下步骤:
cd laravel-video-chat
composer require laravel/ui
php artisan ui vue --auth
然后
npm install && npm run dev
最后
php artisan serve
现在你可以访问http://127.0.0.1:8000来查看Laravel的默认页面。
注:WebRTC仅在来源安全(HTTPS或localhost)情况下可用。所以如果你使用的不是localhost, 请换成HTTPS来运行操作。
步骤2——安装所需包
在你的终端中,通过运行以下命令安装 “simple-peer “和 “pusher-js”:
npm install simple-peer --save-dev
npm install pusher-js --save-dev
之后,按照本项目需求,用Composer添加PHP库与Pusher交互:
composer require pusher/pusher-php-server
步骤3——创建Pusher账号
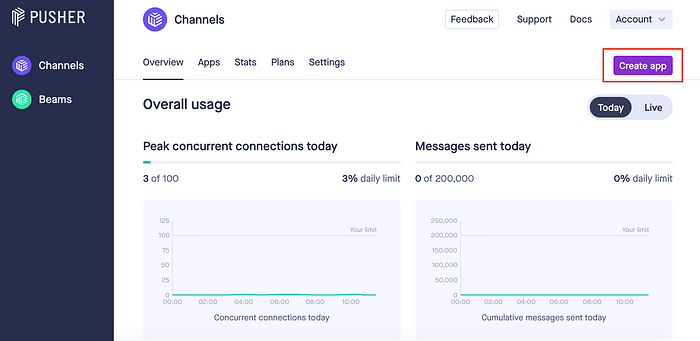
前往Pusher网站注册账号。
账户创建后,点击仪表盘中的 “创建应用(Create app) “按钮。
填写注册表。完善以下信息:
❶输入’laravel-video-chat’;
❷选择你心仪的地址;
❷选择Vue.js;
❷选择Laravel;

完成注册后,点击“应用密码”选项,查看凭证。
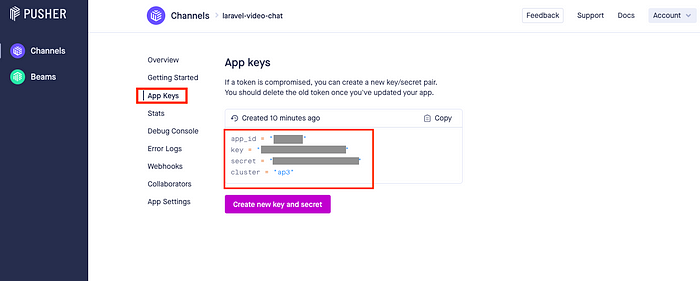
用上述凭证更新你的.env文件。
.env
PUSHER_APP_ID=******
PUSHER_APP_KEY=********************
PUSHER_APP_SECRET=********************
PUSHER_APP_CLUSTER=ap3
最后,启用客户端事件。
点击“应用设置”选项,勾选“启用客户端事件”,点击“更新”。
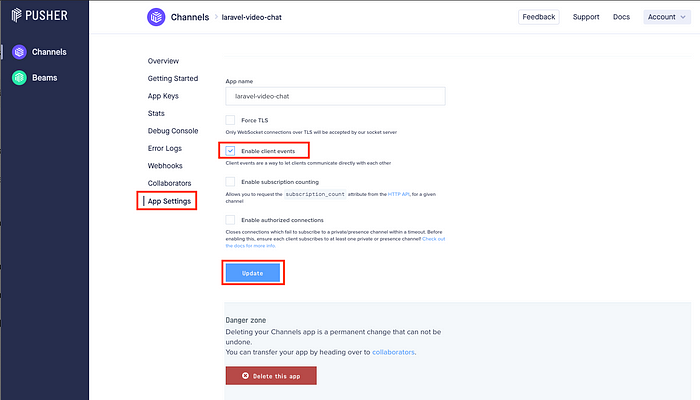
Pusher的设置到这里就全部完成了。
步骤4——创建页面
现在需要我们编写代码了。
定义路径
如下所示,在你的route/web.php中定义route:
// web.php
Route::group([‘middleware’ => ‘auth’], function(){
  Route::get(‘video_chat’, ‘VideoChatController@index’);
  Route::post(‘auth/video_chat’, ‘VideoChatController@auth’);
});
创建控制器
要运行项目,首先要在你的终端上运行artisan命令来创建一个新的控制器。
php artisan make:controller VideoChatController
该命令会在app/Http/Controllers/VideoChatController.php创建一个新的文件。
打开新创建的控制器进行修改,修改内容如下:
// VideoChatController.php
<?php
namespace App\Http\Controllers;
use Illuminate\Http\Request;
use Pusher\Pusher;
class VideoChatController extends Controller
{
    public function index(Request $request) {
        $user = $request->user();
        $others = \App\User::where('id', '!=', $user->id)->pluck('name', 'id');
        return view('video_chat.index')->with([
            'user' => collect($request->user()->only(['id', 'name'])),
            'others' => $others
        ]);
    }

    public function auth(Request $request) {
        $user = $request->user();
        $socket_id = $request->socket_id;
        $channel_name = $request->channel_name;
        $pusher = new Pusher(
            config('broadcasting.connections.pusher.key'),
            config('broadcasting.connections.pusher.secret'),
            config('broadcasting.connections.pusher.app_id'),
            [
                'cluster' => config('broadcasting.connections.pusher.options.cluster'),
                'encrypted' => true
            ]
        );
        return response(
            $pusher->presence_auth($channel_name, $socket_id, $user->id)
        );
    }
}
创建前端
接下来,在resources/js/components文件夹中创建一个新的Vue组件VideoChat.vue,用来容纳我们的视频聊天房间逻辑。
创建组件后,添加以下代码:
// VideoChat.vue
<template>
  <div class="container">
    <h1 class="text-center">Laravel Video Chat</h1>
  </div>
</template>
<script></script>
然后,打开resources/js/app.js,在ExampleComponent下添加以下代码,全局定义我们的新组件。
// app.js
Vue.component(‘video-chat’, require(‘./components/VideoChat.vue’).default);
最后,我们需要创建resources/views/video_chat/index.blade.php来显示我们的组件:
// index.blade.php
@extends('layouts.app')
@section('content')
<video-chat :user="{{ $user }}" :others="{{ $others }}" pusher-key="{{ config('broadcasting.connections.pusher.key') }}" pusher-cluster="{{ config('broadcasting.connections.pusher.options.cluster') }}"></video-chat>
@endsection
编辑Vue组件
按以下代码更新VideoChat.vue:
VideoChat.vue
<template>
  <div class="container">
    <h1 class="text-center">Laravel Video Chat</h1>
    <div class="video-container" ref="video-container">
      <video class="video-here" ref="video-here" autoplay></video>
      <video class="video-there" ref="video-there" autoplay></video>
      <div class="text-right" v-for="(name,userId) in others" :key="userId">
        <button @click="startVideoChat(userId)" v-text="`Talk with ${name}`"/>
      </div>
    </div>
  </div>
</template>
<script>
import Pusher from 'pusher-js';
import Peer from 'simple-peer';
export default {
  props: ['user', 'others', 'pusherKey', 'pusherCluster'],
  data() {
    return {
      channel: null,
      stream: null,
      peers: {}
    }
  },
  mounted() {
    this.setupVideoChat();
  },
  methods: {
    startVideoChat(userId) {
      this.getPeer(userId, true);
    },
    getPeer(userId, initiator) {
      if(this.peers[userId] === undefined) {
        let peer = new Peer({
          initiator,
          stream: this.stream,
          trickle: false
        });
        peer.on('signal', (data) => {
          this.channel.trigger(`client-signal-${userId}`, {
            userId: this.user.id,
            data: data
          });
        })
        .on('stream', (stream) => {
          const videoThere = this.$refs['video-there'];
          videoThere.srcObject = stream;
        })
        .on('close', () => {
          const peer = this.peers[userId];
          if(peer !== undefined) {
            peer.destroy();
          }
          delete this.peers[userId];
        });
        this.peers[userId] = peer;
      }
      return this.peers[userId];
    },
    async setupVideoChat() {
      // To show pusher errors
      // Pusher.logToConsole = true;
      const stream = await navigator.mediaDevices.getUserMedia({ video: true, audio: true });
      const videoHere = this.$refs['video-here'];
      videoHere.srcObject = stream;
      this.stream = stream;
      const pusher = this.getPusherInstance();
      this.channel = pusher.subscribe('presence-video-chat');
      this.channel.bind(`client-signal-${this.user.id}`, (signal) =>
      {
        const peer = this.getPeer(signal.userId, false);
        peer.signal(signal.data);
      });
    },
    getPusherInstance() {
      return new Pusher(this.pusherKey, {
        authEndpoint: '/auth/video_chat',
        cluster: this.pusherCluster,
        auth: {
          headers: {
            'X-CSRF-Token': document.head.querySelector('meta[name="csrf-token"]').content
          }
        }
      });
    }
  }
};
</script>
<style>
.video-container {
  width: 500px;
  height: 380px;
  margin: 8px auto;
  border: 3px solid #000;
  position: relative;
  box-shadow: 1px 1px 1px #9e9e9e;
}
.video-here {
  width: 130px;
  position: absolute;
  left: 10px;
  bottom: 16px;
  border: 1px solid #000;
  border-radius: 2px;
  z-index: 2;
}
.video-there {
  width: 100%;
  height: 100%;
  z-index: 1;
}
.text-right {
  text-align: right;
}
</style>
我来解释一下setupVideoChat函数里一些主要的代码部分。
1. 使用navigator.mediaDevices.getUserMedia访问设备;
2. 调用getPusherInstance来实例化Pusher实例。我们要在标题中传递’X-CSRF-Token’来进行验证;
3. 绑定client-signal-${this.user.id}通道来接收事件;
4. 在getPeer函数里创建一个新的WebRTC对等连接,设置signal、stream和close等基本操作。
当对等端要向远程端发送信令数据时,signal启动。stream用来接收可用视频标签显示的远程视频流。
close会在对等端连接关闭时被调用。
步骤5——测试
如果你很长时间没更新了,可能就需要重新编译代码,以便Vue检测我们所做出的改变。运行npm run dev,确保你在一个独立终端中运行php artisan serve,刷新浏览器。
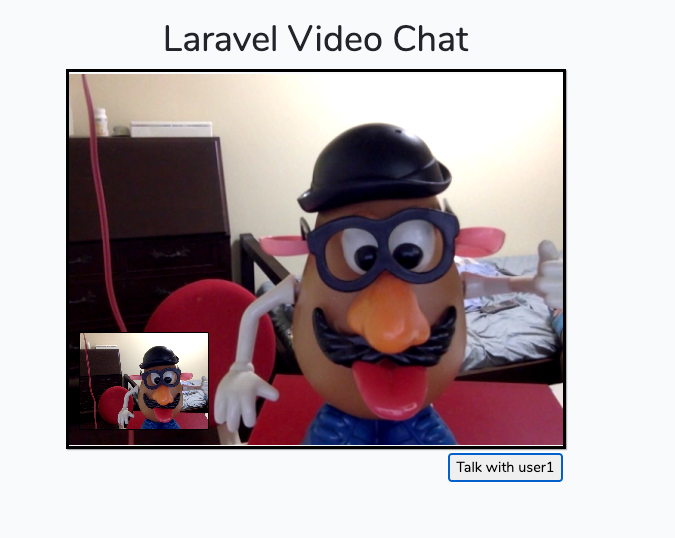
然后创建2个用户,在不同的浏览器中登录,加载http://127.0.0.1:8000/video_chat。另外,你还需要设置数据库来完成用户注册。
最后,点击“与<xxx>(用户名)对话”按钮,你就能看到远程用户了。
希望本篇文章能对你有所帮助!
参考资料:Laravel Web RTC tutorial in Japanese, Laravel Web RTC tutorial in React
原文作者:Takaaki Ota